We've made many journals together, you and I. You would think, as I wrote on the last pages of my plain black (bought) sketchbook—it spanned nearly two years—I would be eager to try out one of the many handmade journals. Would it be the corduroy-covered one? The one with the found paper cover? One of the Sashiko-inspired ones? Er, none of the above. I like 8 1/2 x 11" pages. I went to the art store and bought another plain black sketchbook, this time a Cachet Classic Black Hardbound Sketch Book 8-1/2 x 11 inch. I have used various brands I like: Canson and Cachet are two, and I've used some house brands I don't like so much. I have found that the better quality ones are really better quality. The 70 lb. acid free paper is a good weight for various media (see my favorites at this post). And the bindings hold up much, much better. I had one cheap one that fell apart. How many are we talking about? I don't know. I used to go through three a year. The computer has slowed me down, so now it takes about one to two years to fill a plain black journal.
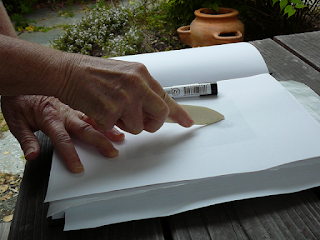
 My pet peeve is a book with nothing on the cover: no design, no way of knowing which end is up. These black journals pose that problem. But I've found a way to customize them. Using our friend from a previous post, the mallet, and some alpha-numeric stamps commonly used for leather or metal such as 5/32-Inch Letter and Number Stamp Set, we can create a kind of faux foil stamping with the addition of a silver Sakura Pigma Gelly Roll Pen. Hit the punches into the cover. Color in the depressions.
Recently, I've started by giving the new journal a theme, something I'm thinking about at the moment. I don't worry if the contents eventually veer from the theme.
This time, I also had an idea for a frontispiece. I decided to do a colorless-blender transfer from a photocopy. It only works with a Chartpak Ad Marker Colorless Blender and a fresh copy or laserwriter printout (it does NOT work with inkjet, ONLY with toner-based prints). Choose a photo, then…


Back to the cover: here are other alphabet styles for the stamps. You can get them at some craft supply stores, at Tandy Leather (they have little icons such as a music note, acorn, leaf, skull and crossbones, rattlesnake, and even a tiny footprint as well as Native America symbols and more), and through the links connected to the images, below. These are terrific stamps to use when making Distressed Book Covers as well.


Recently, I've started by giving the new journal a theme, something I'm thinking about at the moment. I don't worry if the contents eventually veer from the theme.
This time, I also had an idea for a frontispiece. I decided to do a colorless-blender transfer from a photocopy. It only works with a Chartpak Ad Marker Colorless Blender and a fresh copy or laserwriter printout (it does NOT work with inkjet, ONLY with toner-based prints). Choose a photo, then…
- Open the photo in Photoshop (I'm working with the ancient CS3)
- Go to Image<Mode<Grayscale
- Go to Image<Adjustments<Brightness/Contrast. Pull it up so that you can get as much light and dark contrast as possible.
- Go to Filter<Sharpen. Repeat until the image looks really crisp.
- Go to Image<Rotate Canvas<Flip Canvas Horizontal (I forgot to do this with my image).
- Go to Image<Image Size< Type in the size you want, mine was 4" x 5", 300ppi
- Print it out in black and white.
Materials: fresh photocopy or printout; waxed paper (to protect other pages); journal or other paper; colorless blender; bone folder
Find a place to work outside; the fumes from the blender pen are nasty. Put a piece of waxed paper between the first two pages of the journal as a barrier (remove it after you've completed your transfer). On the first page, place your photo face down where you want it to go. Use the blender and color the back of the photo. Work in small areas, about a quarter of the image at a time. When the paper becomes a bit translucent, use a bone folder to burnish the image. You should be able to lift up the printout periodically to check on the image. Success depends on the amount of solvent plus the amount of pressure. It may vary, depending on the kind of paper you are using and the contrast of the image. My old blender pen ran out of solvent after I finished the face…
So (oh darn, just kidding) I had to go to the art supply store and buy another to try again. In the Ad Marker display the blender pen said only "blender" and not "colorless blender." It's the same. This time in Photoshop I added type and used the pencil tool to scribble digitally on the photo before I reversed the complete image and printed it out.
It takes some experimentation to figure out which photos are going to work. The higher the contrast, the better. But, never fear, even muddy prints can be the background for some interesting colored pencil drawings.
Comments