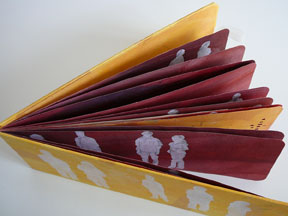
 I recently discovered that Hans Christian Andersen carried a small scissors around with him and cut out a silhouette while he told a story. When he was done cutting the story was over, and he held up the art for a final surprise.
This project takes the silhouette in a ghostly direction, using gesso and graphite coupled with stencils. Try creating a series of sequenced images as a starting point for a handmade book. Begin with some photos. At an event, stand in one place and try taking eight pictures, perhaps over several minutes. You'll notice how the people (or animals) move together and apart, changing positions. How close or far apart they stand tells you a little about their relationships. Print out 4x6 photos in black and white on any kind of paper.
For this exploration you will need: frosted Mylar (.003 or .005 mil); X-Acto knife and cutting mat; pencil; flat-bottomed stencil brush; white acrylic gesso; Ebony pencil or soft, dark pencil; dark paper or pages
- Take small pieces of frosted Mylar that are approximately the same size as the photo and draw or trace the outline of one person in the center of the Mylar. Use one piece of Mylar per person, per pose.
- Place each sheet of Mylar on a self-healing cutting mat or piece of cardboard.
- With an X-Acto knife, cut out each silhouette.
- Using a flat-bottomed brush dipped in white gesso, paint with a stamping motion to make the white image onto a darker paper.
- Repeat for all images, arranging the people in different configurations for different pages.
- Let dry.
- With a very soft, dark pencil, such as an Ebony, gently shade the shadows (refer back to the photos as needed), giving depth to the final image(s).
 | ||
| From the artist's book, Anchovies & Gossip |
For general and more detailed information about stenciling, including multicolored images, please see my book Painted Paper.
Comments