A new year! Time for a new binding! Last week I dreamed that a long-lost friend had bound a book of her drawings with this exposed stitch binding. I had never made it before. When I dream a book I have to see if it works in waking life and since it does, here it is.
The stitching is based on the three-hole, pamphlet style stitch. In this case, it works best for smaller books, under about eight inches tall. My first model was 3" x 3 1/2" [76mm x 89mm]. Make it 2 3/4" x 3 [60mm x 76mm] if you want to make a strictly miniature book. (Miniatures are less than 3" in any dimension.)
Book cloth reinforces the spine of this softcover book to hold the sewing. You can personalize the look depending on the weight and colors of thread you choose. I made the first one using one color of unwaxed linen thread, and it is still the one I like best. If you choose to knot the thread on the outside, the book has a fringe as its center focus. If you have scraps of thread, this would be a perfect opportunity to use them up. Try a different color for each signature. Set an eyelet in the center hole for reinforcement. Experiment with embroidery thread. This binding has the potential for some bright color combinations.

Choices & Variations
Shown above from L to R
1. Single color: One color of thread, knots on inside (thin thread)
2. Single color: One color of thread, knots on inside (thick thread)
3. Multiple colors: One color of thread per signature, knots on inside (waxed linen shown)
4. Multiple colors (or single color, not shown): One color of thread per signature, knots on outside (waxed linen shown)
5. Single color with eyelet (or multiple colors, not shown): One color of thread, knots on inside
As I made the models I noticed that the book is based on centers. The wrapper is measured from the center outward. Book cloth is glued to the center of the wrapper. Sewing begins with the center signature and works toward the front and back. The stitches begin with the center hole. Remembering to center oneself is always useful, too.

Materials: Canson Mi-Tientes cover paper (or other medium-weight or heavyweight paper), 12 1/2" x 3 3/4" [316mm x 95 mm](grained short); book cloth strip, 2" x 5" [51mm x 127] and book cloth strip, 2" x 3 1/2" [51mm x 89] (both grained long); 14 sheets of 2-ply Bristol or index weight paper or card, 3 1/2" x 5 3/4" [89mm x 146mm](grained short); linen thread; PVA
note: in place of the card, you could substitute 3-4 sheets of textweight paper per signature, creating a total of 21-28 pages instead of the 14 shown here
Tools: pencil, metal ruler (a center finding ruler is really useful for this), X-Acto knife, self-healing cutting mat, needle, hole punch and mallet or Japanese hole punch, bone folder, brush for gluing, old magazines or glossy catalogue pages for waste sheets

Prepare the cover/wrapper
Measure and mark so you have 1/4" [6mm] on either side of the center (to make a 1/2" [12mm] spine).
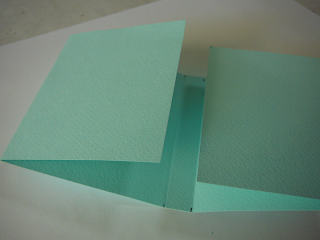
Fold the ends in to the nearest center folds, stopping just short of the folds, about 1/8" [3mm].
Measure and mark the longer piece of book cloth (on the back of it).
Apply PVA to the longer piece of book cloth and glue into place.

Apply PVA to the turn-ins and press down. Use a bone folder to re-crease the spine folds before it dries.

Apply PVA to the shorter piece of book cloth and glue to the inside of spine, aligned with the first strip and centered, head to tail.

Use the bone folder and re-crease the spine folds again.
Let dry before you punch the hole.
Measure, mark, and punch a hole, centered, inside the spine of the wrapper. The diameter of the hole should be smaller than the width of the spine (in this case, less than 1/2" [12 mm]), but large enough to hold all the threads.

Measure 1 1/4" [32mm] from both sides of the center hole toward the head and tail and mark, cut slits across the spine with your knife, guided by the ruler.

Prepare the pages
Fold the 14 pages in half, with the grain.
Nest two at a time, one inside the other to make 7 signatures.
Take one page and find the center, along the spine. Measure, mark and poke a hole with the needle.
Measure, mark, and poke a hole 1 1/4" [32mm](to match cover) from each side of the center hole so you have a total of three sewing stations. (This distance would be longer with taller books.)
Use this page as a template and poke the three holes in each pair of pages.
Remove the template.


You need thread that is approximately 3x the height of the book for each signature. For the hourglass shape to work well, take one of those measured pieces of thread and begin with the center signature (we could call this the 4th signature).

Sew one signature at a time, starting from inside the signature, with the pamphlet, single-signature stitch, through the cover. You will be tying off inside the signature and cutting it after you knot it with a square knot.

Sew in signature 5 below signature 4.
Sew in signature 3 above signature 4.
Keep alternating, front and back, until all 7 signatures are sewn into the wrapper.


The stitching is based on the three-hole, pamphlet style stitch. In this case, it works best for smaller books, under about eight inches tall. My first model was 3" x 3 1/2" [76mm x 89mm]. Make it 2 3/4" x 3 [60mm x 76mm] if you want to make a strictly miniature book. (Miniatures are less than 3" in any dimension.)
Book cloth reinforces the spine of this softcover book to hold the sewing. You can personalize the look depending on the weight and colors of thread you choose. I made the first one using one color of unwaxed linen thread, and it is still the one I like best. If you choose to knot the thread on the outside, the book has a fringe as its center focus. If you have scraps of thread, this would be a perfect opportunity to use them up. Try a different color for each signature. Set an eyelet in the center hole for reinforcement. Experiment with embroidery thread. This binding has the potential for some bright color combinations.

Choices & Variations
Shown above from L to R
1. Single color: One color of thread, knots on inside (thin thread)
2. Single color: One color of thread, knots on inside (thick thread)
3. Multiple colors: One color of thread per signature, knots on inside (waxed linen shown)
4. Multiple colors (or single color, not shown): One color of thread per signature, knots on outside (waxed linen shown)
5. Single color with eyelet (or multiple colors, not shown): One color of thread, knots on inside
As I made the models I noticed that the book is based on centers. The wrapper is measured from the center outward. Book cloth is glued to the center of the wrapper. Sewing begins with the center signature and works toward the front and back. The stitches begin with the center hole. Remembering to center oneself is always useful, too.

Single color of thread, knots inside
note: in place of the card, you could substitute 3-4 sheets of textweight paper per signature, creating a total of 21-28 pages instead of the 14 shown here
Tools: pencil, metal ruler (a center finding ruler is really useful for this), X-Acto knife, self-healing cutting mat, needle, hole punch and mallet or Japanese hole punch, bone folder, brush for gluing, old magazines or glossy catalogue pages for waste sheets

knots inside each signature
(start sewing from the inside, center hole)
Measure and mark so you have 1/4" [6mm] on either side of the center (to make a 1/2" [12mm] spine).

Fold the ends in to the nearest center folds, stopping just short of the folds, about 1/8" [3mm].
Measure and mark the longer piece of book cloth (on the back of it).
Apply PVA to the longer piece of book cloth and glue into place.

Apply PVA to the turn-ins and press down. Use a bone folder to re-crease the spine folds before it dries.

Apply PVA to the shorter piece of book cloth and glue to the inside of spine, aligned with the first strip and centered, head to tail.

Use the bone folder and re-crease the spine folds again.
Let dry before you punch the hole.
Measure, mark, and punch a hole, centered, inside the spine of the wrapper. The diameter of the hole should be smaller than the width of the spine (in this case, less than 1/2" [12 mm]), but large enough to hold all the threads.

Measure 1 1/4" [32mm] from both sides of the center hole toward the head and tail and mark, cut slits across the spine with your knife, guided by the ruler.

Prepare the pages
Fold the 14 pages in half, with the grain.
Nest two at a time, one inside the other to make 7 signatures.
Take one page and find the center, along the spine. Measure, mark and poke a hole with the needle.
Measure, mark, and poke a hole 1 1/4" [32mm](to match cover) from each side of the center hole so you have a total of three sewing stations. (This distance would be longer with taller books.)
Use this page as a template and poke the three holes in each pair of pages.
Remove the template.


Sew one signature at a time, starting from inside the signature, with the pamphlet, single-signature stitch, through the cover. You will be tying off inside the signature and cutting it after you knot it with a square knot.

Sew in signature 5 below signature 4.
Sew in signature 3 above signature 4.
Keep alternating, front and back, until all 7 signatures are sewn into the wrapper.


That's it! Time to make another!
You can see the single signature tutorial in more detail in this post.
Single signature binding and discussion of paper grain also in Making Handmade Books: 100+ Bindings, Structures & Forms.

Single signature binding and discussion of paper grain also in Making Handmade Books: 100+ Bindings, Structures & Forms.
Addendum (3:14pm): rebind with embroidery thread,
my new favorite

Comments
Thanks for sharing this - I really think I will have a go, when I get back into the studio this week. :-)