In the early 2000s I made dozens of monotypes, maybe even hundreds. But eventually, the water-based Createx inks I was using changed or my method changed; in any case, something happened, the ink started sticking to the Plexi-glass plates and wouldn't come off, and I just couldn't get a good print anymore. So I stopped. I was sorry to let the process go.
My friend, artist Liz Maxwell, told me about printing from gelatin plates, and I rushed off to buy the 2002 book, Making Monotypes Using a Gelatin Plate: Printmaking Without a Press by Nancy Marculewicz that told how to do this. I read it several times, nodding, but as a vegetarian, could never get myself to buy a large quantity of gelatin to make the plate.
So I was ready when Gelli Plates arrived in the art-supply stores. They are pricey; I bought a small 3 x 5" plate for about $13.00. But they are reusable. I wanted to see how easy they were to use and to clean, and if they would yield a satisfactory creative process and final print.


Here are my first attempts. You get to see them as I experimented with this process for the first time.


The book mentioned above, Making Monotypes Using a Gelatin Plate: Printmaking Without a Press, is a great resource for ideas. One thing you can do with gelatin that you cannot do with the Gelli is cut out shapes from the plate. The Gelli must be stored flat and the surface needs to stay smooth. But I see they've begun creating Gelli plates in shapes: currently they have rectangles, squares, and circles available.
Go Print!
My friend, artist Liz Maxwell, told me about printing from gelatin plates, and I rushed off to buy the 2002 book, Making Monotypes Using a Gelatin Plate: Printmaking Without a Press by Nancy Marculewicz that told how to do this. I read it several times, nodding, but as a vegetarian, could never get myself to buy a large quantity of gelatin to make the plate.
So I was ready when Gelli Plates arrived in the art-supply stores. They are pricey; I bought a small 3 x 5" plate for about $13.00. But they are reusable. I wanted to see how easy they were to use and to clean, and if they would yield a satisfactory creative process and final print.


Here are my first attempts. You get to see them as I experimented with this process for the first time.

You can use any water-soluble ink or paint
(but not dyes or stamp pads). Shown here are
a water-soluble block printing ink, a brayer,
and a baren, for rubbing the back
(You can use the back of a spoon if you don't have a baren.)

Acrylic paints and brushes were what I ended up using.

Apply paint to the Gelli.

I cut out some letters from paper and pressed them on
the painted plate.
Flipped them over so they would read correctly after printing.

Put a piece of Stonehenge paper on top of the plate
(other printmaking papers work well, such as:
Rives BFK, Arches Cover, and mulberry paper.
I'm sure other papers would work, too.)
Press and rub gently with the baren.

Pulled the print (top)
Gelli plate with the letters still stuck on (bottom)
At this point, this would be called a monotype.
One plate, one print.
You could actually paint an entire scene with multiple colors and print from that.

The second print is the ghost.
The plate is nearly clean now.

I decided to add more color and more letters.
Painted the plate blue.

You can see that the lowercase n stuck to the plate (bottom).
Printed over the top print.
Now it is a monoprint.
Multiple plates, one print.
I'm not worrying about registration,
although it's pretty easy to center it
with this small paper (approx. 3 3/4" x 6").

Printed the ghost (center).
Plate is nearly clean again.
I decide to keep the residue on the plate
as texture for my next print.

I painted over the residue,
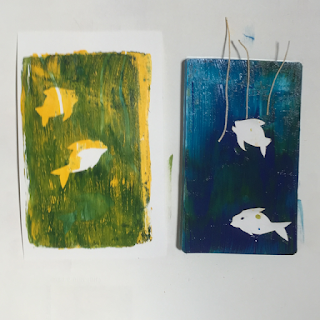
added paper cutouts of fish and some threads.

First print and its plate.
Not printing a ghost this time.

Painted green, moved the fish cutouts.

It's off-register, but I'll keep going.

Painted over with dark blue, added the fish cutouts and threads again.

The layering is starting to look interesting.
Threads stuck to the plate.

I pulled off the threads. Here's a ghost from the plate.

I'll work with the ghost now.
Painted yellow and orange on the plate.
The plate still had blue residue on it.

The blue left around the threads created an interesting effect,
especially against the orange.

I need to add a focal point. (In this case, fish.)
Instead of using the cutout fish as masks,
I'll use the paper I cut them out of as stencils.
Painted blue on the plate where I think the fish will go.

Apply the stencils.

And…print. You can see the edges where I painted
but didn't cover the blue paint.
Not sure how I feel about this, yet.
I'm going to wait and go back to my first fish print.

Cleaning the plate with water and a paper towel.
Apparently you can also use hand sanitizer or baby wipes.
If necessary, you can use warm water and soap.
Imagine taking acrylic paint tubes in your gallon ziploc
and making prints on a long airplane trip.
But I digress.

My first print seems very dark.
It needs a main focus.
A splash of red, perhaps?

Another fish stencil.

Print and plate.
Happy with this look, I'm going back to my second
fish print to add more red and another fish.

Choosing the red areas.

Placing the stencil.

Print and plate.

Two fish prints, quite different.
I'm hooked.
This is way too much fun.
I feel the urge to get a larger plate, maybe a 5 x 7," to use together with the 3 x 5". Some things to try: printing on museum board for book covers, and printing on thinner paper or book cloth used to wrap boards.
The book mentioned above, Making Monotypes Using a Gelatin Plate: Printmaking Without a Press, is a great resource for ideas. One thing you can do with gelatin that you cannot do with the Gelli is cut out shapes from the plate. The Gelli must be stored flat and the surface needs to stay smooth. But I see they've begun creating Gelli plates in shapes: currently they have rectangles, squares, and circles available.
Go Print!
Comments