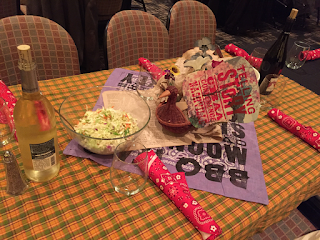
I dreamed a book that had a tableau at the end: a recessed page with a three-dimensional scene. The scene was certainly a banquet table (table/tableau, same root), possibly a version of the Last Supper. Honestly, it was a dream scene, so I don't know. But, as usual, I wondered if one could make the structure in waking life or if it only worked in the dream.
This is one version, completely made out of paper. It should probably be a compact, smooth paper such as bristol. I used scraps of Rives BFK, a printmaking paper that is just a bit too soft. The background paper is Canson Mi-Teintes, which works nicely for this. One could sew a single signature to it before it is glued together and/or attach it to a hard cover. Not sure if I will get that far. If I do, you'll know.
Here's what I got. The dreamed tableau page.
Tools: pencil, metal ruler, X-Acto knife and cutting mat, PVA & small brush or piece of board to spread it, magazine pages to cover the work surface for gluing, low-tack artist's tape (temporary hold)
Materials: one piece of heavy card or bristol, 10 1/2"w x 7"h, grained short; one piece of Canson Mi-Teintes or contrasting paper, 8 1/2"w x 5"h, grained short
Measure, mark, and score 1" margin all around.
Trim out the corner squares.
Measure, mark, and score 1/2" from all edges.
Score from square to square as well (the 1" marks).
Fold up, folding against the metal ruler if needed to keep the fold straight.
Measure and mark out a window in the center.
I like to leave a little more margin at the bottom edge.
Also measure and mark a horizontal line halfway down.
My window is 2 3/4" x 5 3/4".
Using the X-Acto against the metal ruler, cut an H.
(two verticals, the one horizontal)
Use the bone folder against the ruler to score horizontal lines, top and bottom.
Measure, mark and score 1/2" down from each of those new horizontal scores.
Fold up, two valley folds.
Measure the same window in the contrasting paper.
But only cut two horizontals, top and bottom.
Apply glue to the corners of the main paper.
Press them down, using low-tack artist's tape to hold them, if needed.
Turn over the main paper and slide the tabs into the slits in the contrasting paper.
(Remove the tape, if you used it.)
(Remove the tape, if you used it.)
Apply glue to the borders.
Apply glue to the tabs.
Press into place and hold. If you can put the center under a weight, even better.
Add an object, a paper sculpture, a tunnel book, whatever you like.
You may desire to make another and sew it to a single signature before you glue it so that you can include your story and have the object reveal as a surprise at the end.
*
Afterward: I wrote this post before I left for the College Book Art Association Conference—in Nashville, TN, hosted at Vanderbilt University—but not consciously thinking about our finale of an auction and banquet. Look at the lovely table they set for us with a letterpress printed bandana and church fan, and a page from a 100-year-old Bible (don't worry, it was printed on really cheap paper). That cole slaw was really good.
I hope y'all can join us next time!
Next year's meeting is in Florida.
Conference 2018 will be held at University of the Arts, Philadelphia.
Anyone can join the organization and it's three days of talks, workshops, tours, and schmoozing with book arts enthusiasts from all over the country, and occasionally, the world. More on that later…


Comments