Making metallic-looking fabric. I saw the technique in a quilting magazine and wondered if it would work as book cloth. Here's a sample of a copper version (copper, gold, black) with a muslin backing for fabric art, which was my first test. How about mulberry paper backing?

Materials: mulberry paper; silk (I used Habotai silk, 10mm from Dharma Trading Co.); metallic fabric paints such as Jacquard or Lumiere; fusible webbing like Heat 'N' Bond
Note: Paint that is particularly labeled "fabric paint" or "for textiles" is water-based and many brands make it to be soft and non-tacky when it dries (the two I list here are good examples).
Tools: iron; ironing board; brushes; palette or paper plate
This is easiest to handle in small pieces like 16" x 20" or smaller. Start with the paper size you want.
1. Cut a piece of silk a little larger than your mulberry paper (the crinkling makes it shrink).
2. Cut a piece of fusible webbing a little smaller than your mulberry paper (so you won't get the heated glue on your iron).

3. According to the instructions, which on mine was low heat and about 3 seconds, iron the webbing onto the paper. Set aside.


4. Crumple the silk and mist it so it is slightly damp but not overly wet. On the silk setting, bounce the iron up and down while turning the ball of silk so you iron in the wrinkles. Keep crumpling and turning and ironing until the ball is dry. Or let it dry before you proceed.


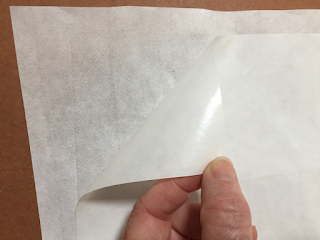
5. Peel off the backing paper from the webbing.
6. Open out the silk and arrange it on the webbing side of the paper you ironed. Try to keep the wrinkles in place. (For just a little crinkly, iron the wrinkles in flat first, before you attach it to the backing.)

7. Again, according to instructions, mine said low heat and about 8-10 seconds and I did about 4-6, gently press the wrinkles down vertically. It's okay if the silk doesn't stick all the way at this point, you will iron it all again later.


8. Layer two to four fabric paint colors on the silk. Use a dry brush and black for shadows. For this one, I used silver, turquoise, gold and black.


9. Let dry in between colors. Keep layering. Let dry completely.
10. Place the backing paper on top of the silk and iron down firmly, pressing down again, just vertically, don't try to move back and forth.


You can now use PVA on the back for book cloth. Because the finished cloth is a little thicker than usual, give yourself four board thicknesses of space between boards for the hinges.
For this hinged lid box, I first made a four-sided tray with compartments (a divided tray is in this blog post), then the case, which had the cloth wrapped around it. In this case, I attached the tray; before attaching the tray, glue down an inner lining to the case, one that overlaps the first hinge inside.


Yes! This works for book cloth! The textile paint is terrific. The metallics, in particular, have a shiny but matte finish and none of the textile paint colors stick to anything (unlike regular acrylic paints, which stay tacky) when dry.

Materials: mulberry paper; silk (I used Habotai silk, 10mm from Dharma Trading Co.); metallic fabric paints such as Jacquard or Lumiere; fusible webbing like Heat 'N' Bond
Note: Paint that is particularly labeled "fabric paint" or "for textiles" is water-based and many brands make it to be soft and non-tacky when it dries (the two I list here are good examples).
Tools: iron; ironing board; brushes; palette or paper plate
This is easiest to handle in small pieces like 16" x 20" or smaller. Start with the paper size you want.
1. Cut a piece of silk a little larger than your mulberry paper (the crinkling makes it shrink).
2. Cut a piece of fusible webbing a little smaller than your mulberry paper (so you won't get the heated glue on your iron).

3. According to the instructions, which on mine was low heat and about 3 seconds, iron the webbing onto the paper. Set aside.


4. Crumple the silk and mist it so it is slightly damp but not overly wet. On the silk setting, bounce the iron up and down while turning the ball of silk so you iron in the wrinkles. Keep crumpling and turning and ironing until the ball is dry. Or let it dry before you proceed.


5. Peel off the backing paper from the webbing.

6. Open out the silk and arrange it on the webbing side of the paper you ironed. Try to keep the wrinkles in place. (For just a little crinkly, iron the wrinkles in flat first, before you attach it to the backing.)

7. Again, according to instructions, mine said low heat and about 8-10 seconds and I did about 4-6, gently press the wrinkles down vertically. It's okay if the silk doesn't stick all the way at this point, you will iron it all again later.


8. Layer two to four fabric paint colors on the silk. Use a dry brush and black for shadows. For this one, I used silver, turquoise, gold and black.


9. Let dry in between colors. Keep layering. Let dry completely.
10. Place the backing paper on top of the silk and iron down firmly, pressing down again, just vertically, don't try to move back and forth.


I added more turquoise after taking this photo.

You can now use PVA on the back for book cloth. Because the finished cloth is a little thicker than usual, give yourself four board thicknesses of space between boards for the hinges.
For this hinged lid box, I first made a four-sided tray with compartments (a divided tray is in this blog post), then the case, which had the cloth wrapped around it. In this case, I attached the tray; before attaching the tray, glue down an inner lining to the case, one that overlaps the first hinge inside.

This box holds 3x5 index cards and pens. A gift for a writer-friend's birthday.

Yes! This works for book cloth! The textile paint is terrific. The metallics, in particular, have a shiny but matte finish and none of the textile paint colors stick to anything (unlike regular acrylic paints, which stay tacky) when dry.
Comments