It was only Day 6 of the San Francisco Bay Area's shelter-in-place directive, but I could already feel that our neighbors with kids were looking for creative ways to stay occupied. I heard Yo-Yo Ma on the radio and how he gave a free concert online, drawing on the power of music to connect and heal, which inspired me. I wondered if there was anything I could do. I've stayed away from making videos; it's not my thing. But I have taught bookmaking to kids. I offered to do a private FaceTime workshop for my friend's six-year-old, and this is what we did.

Materials: plain printer paper is fine, construction paper is fun, magazine pages could work, origami paper; scissors; glue stick; crayons, markers, pencils, etc. (optional)

There are instructions for this flower fold book in Making Handmade Books: 100+ Bindings, Structures & Forms on page 67, but here is slight variation that incorporates making use of whatever paper you have on hand. (If you are using origami paper, omit steps 2 and 3.)
1. Make a square: take one corner across the paper and match the two edges. Fold it diagonally and smooth it down.

2. Using the edge as a guide, cut a line across the paper.

3. Put the top strip aside: you can use it later to make a tiny flower fold book, if you like.

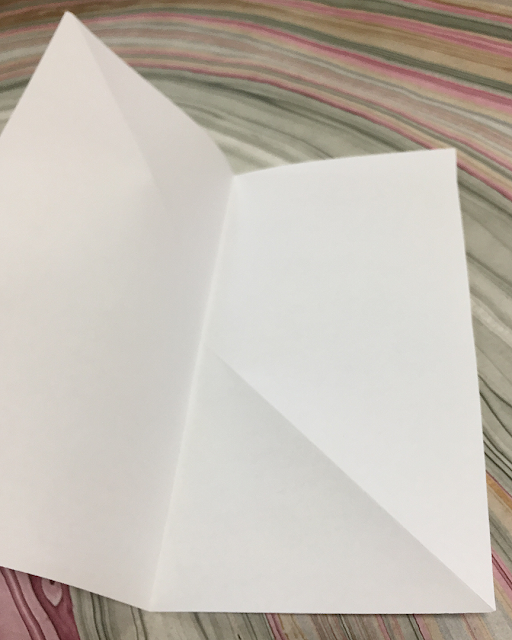
4. Your new square has a fold across it. Open it up. Where the paper dips down in the center, the fold is called a "valley fold."

On the other side, where the paper stands up in the center, the fold is called a "mountain fold."

Make sure the mountain fold is face up.
5. Fold the paper in half and smooth it down to crease it.

6. Open it. Fold it in half the other way and smooth it down to crease it.

7. You now have one mountain fold and two valley folds on your paper.

8. Match the two edges of the mountain fold.

9. Press and flatten the square.

It can also be a diamond shape. Let's call the diamond shapes "petals."

10. Make three more petals. Then:
11. Line up the petals so that the open points face to the right.

12. Put some glue from the glue stick on the smooth top of the one of the petals.

13. Take another petal and put it on top of the first petal and press it flat, lining up the two petals as best you can. Make sure the open point and edges on both are still facing to the right.

14. Glue the third petal the same way, adding it on top of one and two.
15. Glue the fourth petal the same way, adding it on top of one, two, and three.
A flower! You can decorate it, write words in it, draw pictures, or whatever you like. They fold flat so you can put one in an envelope and send it to a friend.

Variation: If you alternate the open points before you glue them together you can make a long dragon, but that may be another post.
Oh, and those strips you saved? You can make some mini books. Just start with a square and you are on your way. Each strip makes three petals, but you could join them all, if you like.


Speaking of poems, April is coming, and it has been called National Poetry Month, so perhaps this can be a spring poetry book you can carry in your pocket for Poem-in-Your-Pocket day, this year on Thursday, April 30, 2020. It will be a little different this year, as most of us likely will be staying home, but you can send pictures of your book to people, or read to them on the phone. You can also sign up at poets.org for a poem-a-day, all year round.
For more adventurous bookmakers, there is a tunnel book for spring described here.

Materials: plain printer paper is fine, construction paper is fun, magazine pages could work, origami paper; scissors; glue stick; crayons, markers, pencils, etc. (optional)

There are instructions for this flower fold book in Making Handmade Books: 100+ Bindings, Structures & Forms on page 67, but here is slight variation that incorporates making use of whatever paper you have on hand. (If you are using origami paper, omit steps 2 and 3.)
1. Make a square: take one corner across the paper and match the two edges. Fold it diagonally and smooth it down.


On the other side, where the paper stands up in the center, the fold is called a "mountain fold."

Make sure the mountain fold is face up.
5. Fold the paper in half and smooth it down to crease it.

6. Open it. Fold it in half the other way and smooth it down to crease it.


7. You now have one mountain fold and two valley folds on your paper.

8. Match the two edges of the mountain fold.

9. Press and flatten the square.

It can also be a diamond shape. Let's call the diamond shapes "petals."

10. Make three more petals. Then:
11. Line up the petals so that the open points face to the right.

12. Put some glue from the glue stick on the smooth top of the one of the petals.

13. Take another petal and put it on top of the first petal and press it flat, lining up the two petals as best you can. Make sure the open point and edges on both are still facing to the right.

14. Glue the third petal the same way, adding it on top of one and two.
15. Glue the fourth petal the same way, adding it on top of one, two, and three.
A flower! You can decorate it, write words in it, draw pictures, or whatever you like. They fold flat so you can put one in an envelope and send it to a friend.

Variation: If you alternate the open points before you glue them together you can make a long dragon, but that may be another post.
Oh, and those strips you saved? You can make some mini books. Just start with a square and you are on your way. Each strip makes three petals, but you could join them all, if you like.


Mother and child

Not just for kids! I used this structure to hold a poem in "Dandelion Roam," part of my Housework book art series. The petals were sewn together (rather than glued), and I tore the edges all around the square papers for a ruffly look. Tearing the edges also means you don't have to have precise folds. : )

For more adventurous bookmakers, there is a tunnel book for spring described here.
Comments