While I was (and still am) quilting the next otter and kelp quilt, I made a gift from scrap fabrics I had previously dyed and pigmented: a patch pumpkin. This is a fairly labor-intensive project, so if you tackle it, allow several hours (approximately 5-8).

Materials: scrap of cotton batting (roughly a square a little larger than the sphere); scraps of fabrics; sewing thread; two or more colors of embroidery thread; metallic thread for embellishments; clean sand (I used horticultural sand, bought at a local nursery); floral wire (optional, bought at JoAnn's)
Tools: Wooden form (in this case, a sphere); pins; scissors for trimming fabric; snips or sharp embroidery scissors for cutting threads; a sharp needle (or two); skewer or pencil and wire snips (if using floral wire)
1. Arrange the batting around the wooden form, pleating as needed. Pin into place. Thread the needle with plain sewing thread and use a whip stitch to anchor all the pleats.

2. Leave enough room at the top to remove the wooden form.

3. Remove the form.

4. Fill the bag comfortably with clean sand. The pumpkin will shrink and tighten as you sew, so don't overfill. As it turned out, I filled mine a little too much, but it still works.

5. Twist or pinch the batting and sew the top stem together. Looks like a dumpling.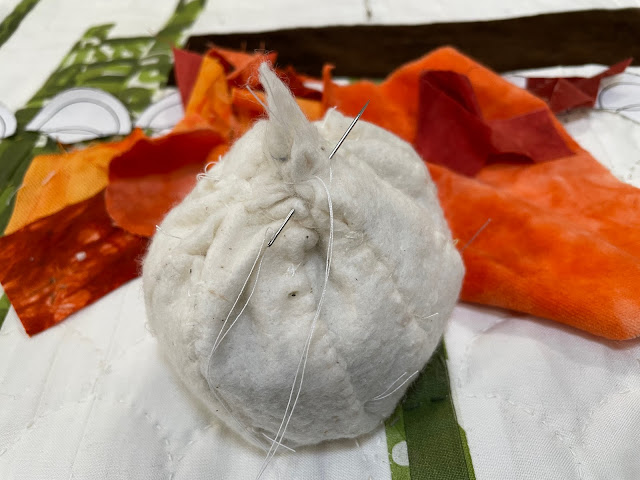

6. Begin basting the scraps with a simple running stitch. I started with an oval at the bottom and worked out from there.

7. Overlap each scrap if you can. It will begin to look like a crazy quilt.


A few of my basting knots are showing in this photo, but I will sew over them later.


9. When all the raw edges are covered, add embellishments with metallic thread, hiding the ends and snipping them if they show.

10. Add a curly vine, if desired, by wrapping floral wire around the stem, then curling the other end around a pencil or skewer.

Done!

Happy Pumpkin-spiced Autumn!
Comments